
How to Treat Mould Prior to Painting
National Painting and Decorating Institute | 28 Jan 2025
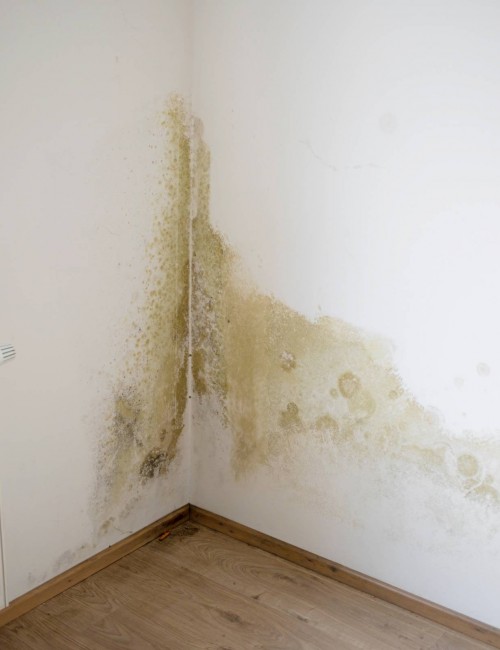
Mould and mildew are common challenges in painting preparation, especially in areas with high humidity or inadequate ventilation. These fungi thrive in environments where moisture is present, making proper treatment and prevention critical for a successful painting project. Below is a guide on how to identify, treat, and prevent mould and mildew before painting, including insights into the role of ventilation.
Why Mould and Mildew Form
Mould and mildew grow due to the presence of moisture combined with inadequate ventilation. Common sources of moisture include leaks, condensation, or poor drainage around buildings. These issues create a damp environment conducive to fungal growth, especially in bathrooms, kitchens, and laundries where humidity levels are naturally higher.
Identifying Mould and Mildew
Mould and mildew are types of microscopic fungi. To confirm the presence of mould or mildew, examine the surface for discoloration, such as black, green, or brown spots. A simple test involves applying a diluted bleach solution: if the stain lightens or disappears, it is likely mould. Conversely, if it remains unchanged, it may be a different type of stain.
Importance of Ventilation
Adequate ventilation is crucial in preventing the recurrence of mould and mildew. Proper air circulation reduces humidity, which is a primary factor in fungal growth. For high-humidity areas like bathrooms, installing exhaust fans or venting dryers to the exterior is highly recommended. In subfloor areas or enclosed spaces, ensure sufficient ventilation through appropriately positioned vents or vapour barriers.
In some cases, structural issues such as damp ground or poor drainage may contribute to moisture buildup. Addressing these problems through improved drainage, moisture barriers, or mechanical ventilation can significantly reduce the risk of mould growth.
What Kills Mould?
Many painters believe that bleach kills mould and it has been commonly recommended as a mould fungicide. It may appear to be effective because it bleaches black mould stains, and appears to make them disappear. Bleach contains sodium hypochlorite, a chemical that effectively kills surface mould on non-porous materials by breaking down its proteins and cellular structure. However, bleach is less effective on porous surfaces like wood, plasterboard, or concrete because it cannot penetrate these materials deeply enough to kill mould roots and spores embedded within. As a result, while the visible mould may disappear, the spores may survive and regrow when conditions are favorable.
Another issue with bleach is that it primarily works as a surface disinfectant, giving a false sense of eradication. Additionally, bleach may contribute to mould regrowth by adding moisture to porous surfaces during the cleaning process, especially if not thoroughly dried afterward. Its effectiveness diminishes over time due to environmental exposure, such as light and heat, which degrade the active ingredients. Being highly alkaline, it also may react with and damage new paint films applied.
Here is a list of fungical household chemicals that kill and remove mould spores:
-
Vinegar: Distilled white vinegar is an effective, natural alternative for killing mould on both porous and non-porous surfaces. Its mild acidity (5% acetic acid) disrupts mould growth and prevents recurrence. It can be sprayed directly onto affected areas and left for an hour before wiping clean.
-
Hydrogen Peroxide: A 3% hydrogen peroxide solution can kill mould and its spores. It penetrates porous materials more effectively than bleach and is less toxic to the environment. Apply and allow it to sit for 10–15 minutes before scrubbing and rinsing.
-
Tea Tree Oil: This essential oil is a natural antifungal agent. Mix 1 teaspoon with 1 cup of water, spray on the mould, and leave it to dry without rinsing.
-
Baking Soda: Combine baking soda with water to create a paste or dissolve it in water as a spray. Baking soda’s alkalinity inhibits mould growth while being safe for humans and pets.
Treating Mould and Mildew
-
Surface Cleaning: Begin by washing the surface with a detergent solution to remove grease and dirt. This step ensures the effective removal of contaminants.
-
Chemical Treatment: Use one of the above fungicide solutions. Apply it using a sponge or cloth, allowing the solution to stay moist on the surface for 15–30 minutes. For persistent stains, reapplication may be necessary. Ensure to regularly clean sponges or cloths to avoid spreading mould spores.
-
Rinse Thoroughly: After treating the area with the chemical, rinse it with copious amounts of clean water to remove any residual solution. This step prevents the fungicide from affecting the adhesion of future paint layers.
-
Additional Prevention: For heavily infested surfaces, use an anti-mould solution (e.g., Paint Type B32) as directed by the manufacturer. Adding fungicidal additives to paint can also provide ongoing protection.
Preventative Measures
- Address the root issue; ventilation. Make sure that bathroom or wet area fans are working and that they are being used. This is the number 1 way to prevent mould.
- Ensure surfaces are clean and completely dry before painting.
- Apply a primer with fungicidal properties to inhibit fungal growth.
- Use paints specifically formulated to resist mould and mildew.
- Regularly inspect and maintain areas prone to high humidity to detect early signs of moisture or mould.
By following these steps, you can effectively treat and prevent mould and mildew, ensuring a durable and visually appealing paint finish.


Hi, I couldn't believe it when I found white mould all along both sides of my car. We had hot and wet weather lately. I tried vinegar twice, and kitchen mould remover you get at the shop twice and the rotten stuff keeps coming back.
I will give the Hydrogen and Soda a try...
Posted on 9th June 2026, 4:29pm
New glass balcony railings are being installed on the balconies of many older strata blocks. There is a small gap left between the old concrete balcony and the glass pane that gets attached to it. Mould grows on the painted concrete behind the glass which cannot be accessed. What do you advise for removing the mould where you cant reach it to spray it or wipe it off?
Posted on 3rd April 2026, 9:33am
thanks for your input on mold removal prior to painting.please correct me if i am wrong. my house is brick veneer on peers with painted plasterboard interior which has mold all over it. my paint preperation plan is 1)clean all walss and cieling with sugar soap,2)after that vclean all serfaces with viniger,3)paint with good quality paint with moul inhibiter. should this last 5 years. thanks ..Dave Riley
Posted on 2nd August 2025, 8:42am